R2 Docuo documentation
Back to the R2 Docuo website

Two factor authentication

Index


       1. Global Configuration

       2. Registration and access


Global configuration


In the "Two factor authentication" tab you can configure the overall rule for all users and collaborators of your repository. This option is only available to the main R2 Docuo ID and users with administrator privileges.


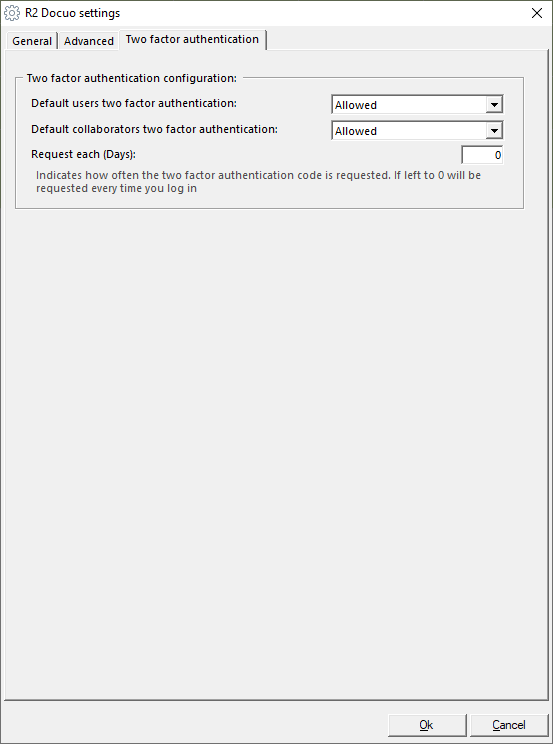
Both users and collaborators have the same configuration settings:


Disabled: This disables the feature completely meaning traditional methods of authentication permit.


Allowed: Once activated the user / collaborator can then choose whether to use this feature or not.


Forced: This option enforces the feature to ensure all users and collaborators must comply.


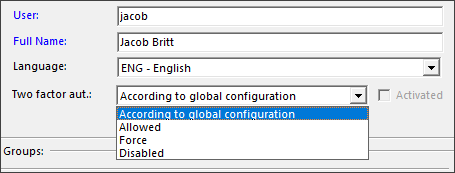
These are the global default configurations, however you can select specific options on an individual user and collaborator level.


The final option "Request each (Days):" allows you to set the number of days before the user is again asked for the unique code. The default setting is "0" which means they will be asked on every login.


Registration and access


Once the global settings have been configured each user and collaborator when they log into R2 Docuo will need to register to be able to use the feature they will need a smartphone or tablet and need the official authenticators from either Microsoft or Google.


The first step will be to register your credentials with the official authenticator you choose. So when you log in you will be shown this screen:


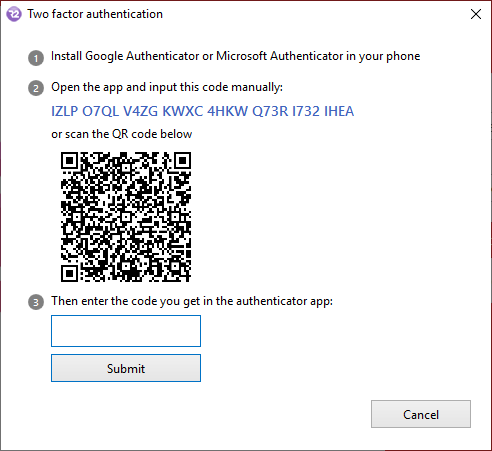
The you have two options, you can enter the unique code manually into the authenticator or use your camera to scan the unique QR code. Then one you have completed either you will be given a 6 digit code to enter into the text box.


Once completed your device is registered with your R2 Docuo account.


Then depending on the global or user / collaborator specific configurations, on each login you will be shown this screen:


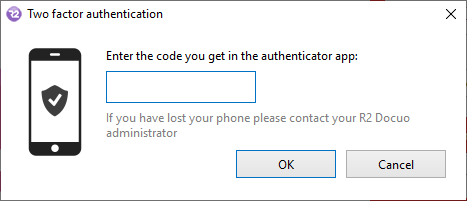
So after the user has entered their username and password they will open the application they registered with on their mobile device and enter the 6 digit generated code to enter R2 Docuo.


The 6 digit code given by the authenticator is on a timer and will expire after a short time meaning that code will become invalid and you must use a newly generated one.


If a user or collaborator has the option set up to choose between using the feature or not that individual will have an extra option in the "Wrench" drop down list in the windows client:


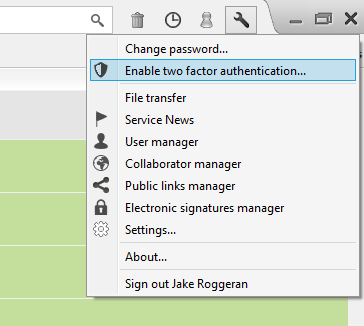
Here they can enable or disable that feature at anytime.

First steps - R2 Docuo documentation

R2 Docuo documentation
Back to the R2 Docuo website

First steps

Index


1  Help organization

2  What you need to get started

3  How to download the R2 Docuo desktop application

4  How to upload documents

5  How to create additional users and collaborators

6  How to customize the R2 Docuo web portal

7  How to create a document category and its workflow

8  How to obtain support


Help organization


Getting started

This section introduces you to the first steps to using R2 Docuo. It is a quick start guide so you can start working with the tool in just a few minutes.

The desktop application

In this section you will find detailed information on how to use the R2 docuo desktop application in order to share, edit or delete documents, to assign categories to documents, or to move documents through the different states of a process.

Administrator guide

This section shows you how to create new folders, categories, users or collaborators, setup user permissions and the main options available for configuring the tool.


What you need to get started


To start using R2 Docuo you need a repository identifier, a user and a password.

If this data is not yet available, the service operator can register in the customer area of the R2 Docuo web site and follow the steps indicated to obtain login details.

Users or collaborators of an existing repository can request this information from the application's administrator.


How to download the R2 Docuo desktop application


  1. Download R2 Docuo from the R2 Docuo web site.
  2. Run the program.
  3. Once the installation process has started, accept all default settings by clicking "Next". 
  4. When installation ends double-click on the R2 Docuo icon that will have appeared on the desktop.
  5. Enter the user name and password used to register to start the trial period.


How to upload documents


From the R2 Docuo desktop application select the folder to which the documents will be uploaded and drag them from the PC to the list of results.

For more information click here.


How to create additional users and collaborators


Users / collaborators are created from the R2 Docuo desktop application in three simple steps:

  1. From the main window of the R2 Docuo desktop application open click on the spanner to open the user or collaborator administrator as applicable.
  2. Click "New user".
  3. Fill in the requested details and click OK.

For more information click here.


How to customize the R2 Docuo web portal


  1. From "My account" in the customer space of the R2 Docuo web site click "Configure".
  2. In the Appearance section click "Change appearance" .
  3. Make the required changes and save.


How to create a document category and its Workflow.


  1. From the categories tree in the R2 Docuo desktop application (purple folder) open the category manager by clicking on the cog icon.
  2. Click "New category".
  3. Enter the name and required code.
  4. If necessary, create fields and attributes.
  5. In the process step check "Define a process for this category".
  6. Change the name of the states and transitions by double-clicking on them and Finish.

For more information click here.


How to obtain support


Under the 'My account' heading of the customer area in the R2 Docuo web site use the "Support" section to report incidents with the application or to query open tickets.